


Ultimate AI Avatar Bot
- Easy setup, zero coding, plug & play file
- Runs on autopilot using ChatGPT
- Fully customizable and adjustable
Bot setup guide
Includes a duplicatable bot template and an exact step-by-step setup guide to get the bot running.
Create an account by clicking here.
You can access the Bot by
Click here
and follow the instructions provided in the tutorial below.
Ultimate A.I. Avatar Bot v2

This is a helluvabot. It is essentially a combination of most of the content bots in the bundle. It combines the blog bot + the content distribution bot + the Stable Diffusion art bot.
One of the first steps you’ll want to take is to gain access to the Twitter API (if you haven’t already).
Here’s how.
Login to the Twitter Developer Portal (CLICK HERE) just need to be logged into your Twitter Account.
Under Projects and Apps, you want to create a Project, and then an App. Make sure it is NOT a Standalone App, but is within the Project.
The steps should be pretty self-guided, but here is more assistance if you need it - CLICK HERE
Once you have an app within a project, you need to “set up” the app here -

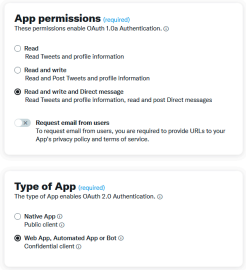
App permissions are read and write. Type of app is web -
Set app info to this (everything else remains blank) -
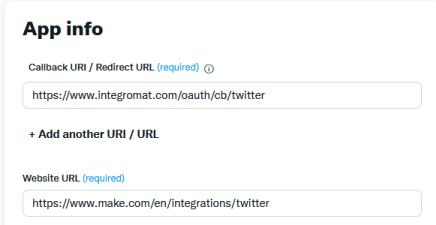
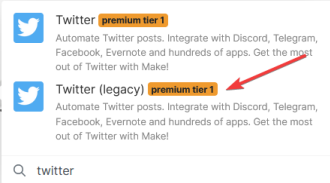
*IMPORTANT NOTE - You need to create a connection with BOTH the legacy app and the most recent app (in Make these are v5 and v6 of the Twitter modules). In order to do that you must have the correct Callback URI/ Redirect URL.
cb/twitter will allow you to create a connection with the legacy v5 version of the app. cb/twitter2 will allow you to create a connection with the v6 version of the app.
The Make.com instructions (located here - CLICK HERE ) show you how to connect both.

After you save that, everything should be ok to set up your connection in Make.com
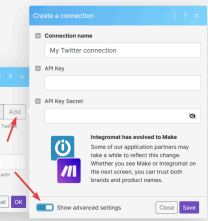
When you create a connection with the legacy module (v5) you need your API information, not Client ID info. When you create a connection with the v6 module, you will need your Client ID and Secret, NOT API info. So be sure to save BOTH. ALSO, you must click to Show Advanced to input it -
Next, you will need a ModelsLab (formerly stablediffusionapi.com) account for this (CLICK HERE)
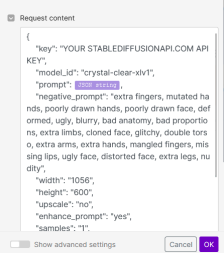
All parameters are already filled out, you simply need to input your API keys (in BOTH http modules).
You may also want to play around with the image output dimensions (though they are currently set at landscape).
For more information on how to manipulate your images in ModelsLab API, check out their API docs -
The notes cover just about everything, but here are some more insights to help you along:
First, remember to input YOUR topics in the topic randomizer. Add as many as you like. If you have over seven, then just add more like this - ;8;topic8;9;topic9;10;topic10. Just add a “;” before and after the next number and then the topic. And then adjust the total at the top of the equation (currently set at 7).

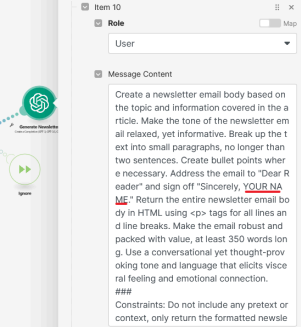
The OpenAI modules all have their prompts already set up in them, but PLEASE EDIT THEM for your own needs. The prompts won’t be perfect for every user. It’s easy to edit them too. Just write in what you need the A.I. to consider or know based on your specific situation.
You will specifically NEED to edit the last prompt in the Newsletter module to include your name -
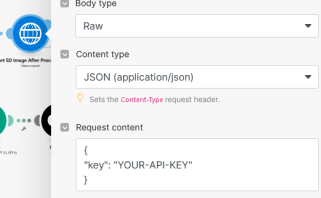
In the Get Stable Diffusion Image HTTP module, remember to input your API key from stablediffusionapi.com. This goes here AND in the second HTTP module on the top track that “Get’s SD Image after Processing.” The API key goes in the Body text (which is in JSON).
If the scenario fails, it may happen here. That’s why there are so many error handlers. So that the blog and newsletter still publish even if the image fails. The reason is because the A.I. is writing the prompt for the image. BUT, sometimes it gets it wrong and makes a list of 5 or something else that will be ill-formatted for the StableDiffusion API.
The router splits the scenario into two tracks because the StableDiffusion api sometimes spits out an image, and sometimes spits out that the image is still processing, meaning you have to make another API call to retrieve it.
Also don’t forget to connect your LinkedIn, Instagram, Twitter, and GetResponse accounts. You can swap out GetResponse for another service if it allows you to create a newsletter. Note, if using Mailerlite, you will need two modules, one to create a campaign and another to send it.
Many of the social modules also have Ignore error handlers. This is because they often throw errors when their APIs are acting weird. With the ignore handler, if that happens the entire scenario won’t get shut off.
Also, remember from the Welcome Instructions, if you get an error when trying to connect an account, it was because Make is apt to error when connecting new accounts through an imported Scenario.
You’ll need to create a NEW scenario, add the modules for accounts you need to connect (for this one it is OpenAI, Medium, GetResponse, LinkedIn, Twitter, and IG business) and then click “Add” to connect your account. THEN, when those connections exist, you can import the scenario and you’ll see your account in the dropdown (don’t click Add).
Automate the bots effortlessly with our user-friendly platform and unlock the power of AI-driven efficiency in just a few simple steps!
To maximize the performance and engagement of this bot, it is crucial to tailor the ChatGPT prompts to your unique business context.
Don't miss out on the incredible opportunities that await - launch your bot now and experience the game-changing benefits of AI firsthand!
