Twitter Thread Bot from Form v2
- Easy setup, zero coding, plug & play file
- Runs on autopilot using ChatGPT
- Fully customizable and adjustable
Bot setup guide
Includes a duplicatable bot template and an exact step-by-step setup guide to get the bot running.
Create an account by clicking here.
You can access the Bot by
Click here
and follow the instructions provided in the tutorial below.
Twitter Thread Bot v2

First step is to gain access to the Twitter API (if you haven’t already).
Here’s how.
(First, here are Make’s instructions - CLICK HERE )
Login to the Twitter Developer Portal (CLICK HERE) just need to be logged into your Twitter Account.
Under Projects and Apps, you want to create a Project, and then an App. Make sure it is NOT a Standalone App, but is within the Project.
The steps should be pretty self-guided, but here is more assistance if you need it - CLICK HERE
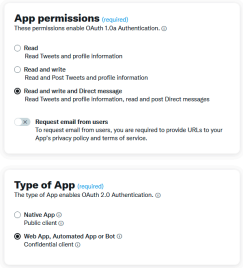
Once you have an app within a project, you need to “set up” the app here -

App permissions are read and write. Type of app is web -
Set app info to this (everything else remains blank) -
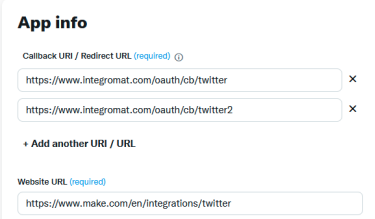
The reason you need two URI callback URLs is because you will be using BOTH the Twitter and Twitter legacy apps (v5 and v6).
“Legacy” is v5 and you use the Upload Media and Make an API call modules with that. The regular Twitter is v6 and you use Create a Tweet with that.
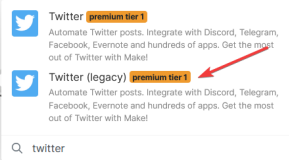
When you create a connection, you will need your API information for the v5 legacy module and your Client ID and Secret for v6 (so save them both). Click “show advanced settings” to get there.
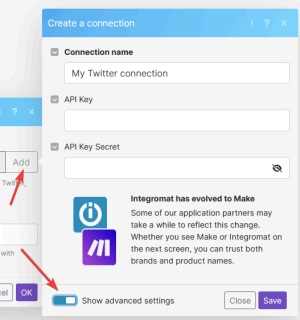
Why do we need a connection with both app versions?
Because this scenario tweets both text AND media. However, in order to tweet media, you need to upload it to Twitter first. Tweeting is a v6 module action. Uploading media is a v5 module action (as well as the api call that allows you to reply to tweets making threads possible).
Now everything else is already pre-input.
Next you need to customize the scenario to your needs.
Do that by first inputting YOUR topics into the topic rotator.
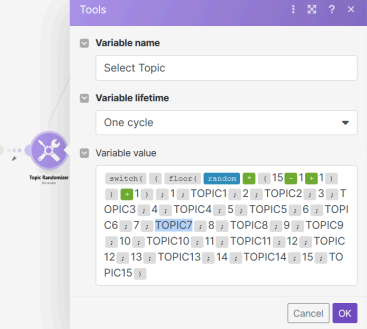
Next, remember to connect your OpenAI account.
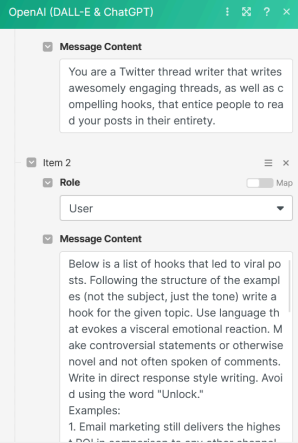
Then open the Hook Bot and Thread Bot modules.
You can adjust the prompts to fit your specific needs. You can also adjust the examples by adding your own. Play around with this so that your thread writer outputs the type of content you want to be posting.
If you decide you would like to continue to use A.I. imagery, you can continue using the ModelsLab API. However this Scenario makes API calls using ModelsLab.com (sign up for an account here ⇒ CLICK HERE )
You will need your own account and API key. Otherwise you will need to delete the HTTP modules and replace them with your own image source.
How this Scenario works, the first HTTP module makes the API request using the prompt written by GPT. Sometimes the image is generated immediately, sometimes it needs a few minutes. That is why there is a router. If the status comes back as “success” it grabs the image immediately. If it comes back as “processing” it waits 5 minutes then grabs the image.
In the HTTP modules you MUST input your own API key.
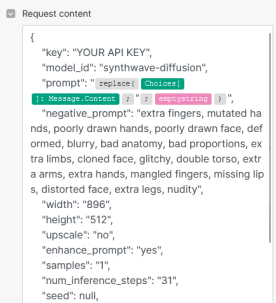
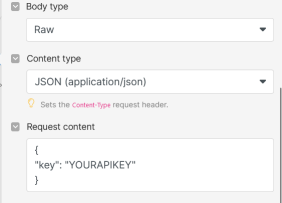

ALSO, you need to choose what trained model you want to use. There are several “public” models available on the stablediffusionapi.com website.
Simply grab the model ID from the code on the right.

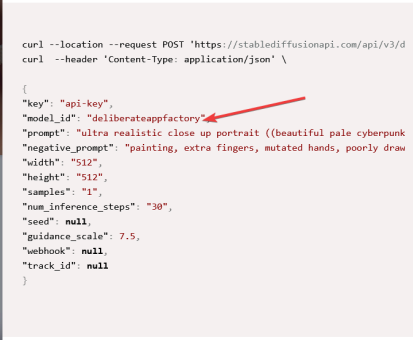
*IMPORTANT NOTE
Each Twitter module uses a formula so that it cannot exceed 280 characters. OpenAI struggles with using too many characters even when you tell it not to.
As such, a formula has been put in place that will ONLY publish 279 characters to Twitter, even if the tweet is longer. So, you may have, on occasion, tweets in your thread that are cut off (this is a better outcome than the thread only publishing the first four or five tweets).
The scenario also allows for up to 16 tweets. That’s a hook tweet (with the image) and then 15 tweets from a table of tweets generated by GPT.
The reason all of the Twitter API call modules have an “ignore” error handler is in case the thread is shorter than that, the remaining modules will simply be ignored.
You will need to continue adding Twitter API modules, sleep modules, and JSON modules to make it longer if you want more than 16 tweets in your thread.
Remember this is YOUR scenario now. So you can change it however you like. Make it work for you.
Twitter Thread Bot from Form v2
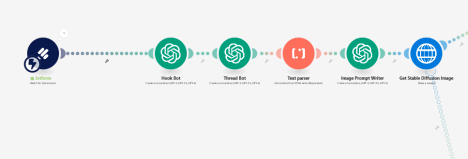
This scenario is identical to the previous one…with only one exception. It doesn’t have a topic rotator, but instead has a form input. The scenario also doesn’t run on a schedule since it has a form trigger. Basically, you create a Jotform form, input context for the video into the form, and that will trigger the flow and the data will be passed to the A.I.
Here’s how you set that up. It requires a (free) Jotform account (CLICK HERE). Once you have a Jotform account, you can create a form (it’s really easy).
Just create a form with a short text input or long text (depending on how much details you want to give the A.I. vs how much you want it to create on its own)...
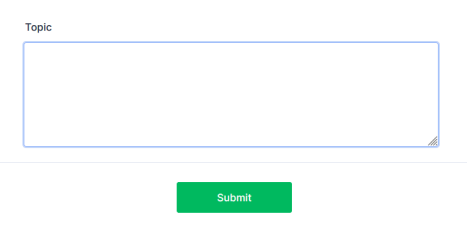
Once you have the form, then you need to connect it to your scenario.
You do this by clicking Add, and then Make will create a webhook. Simply name your webhook and then tell it which form you want it connected to and that’s it.
*PROTIP, you need to run the Jotform module first before any output can be used as a variable in other modules. So, disconnect Jotform from all other modules and then click run. Then fill out your form (go to the Publish page and just open it in a new window) and click Submit. This will trigger the module. Then when you reconnect it, you’ll see your answers as variables.

Automate the bots effortlessly with our user-friendly platform and unlock the power of AI-driven efficiency in just a few simple steps!
To maximize the performance and engagement of this bot, it is crucial to tailor the ChatGPT prompts to your unique business context.
Don't miss out on the incredible opportunities that await - launch your bot now and experience the game-changing benefits of AI firsthand!


