


TikTok Recreator - Keyword Bot v2
- Easy setup, zero coding, plug & play file
- Runs on autopilot using ChatGPT
- Fully customizable and adjustable
Bot setup guide
Includes a duplicatable bot template and an exact step-by-step setup guide to get the bot running.
Create an account by clicking here.
You can access the Bot by
Click here
and follow the instructions provided in the tutorial below.
TikTok Recreator (User)

These flows are…DOOZIES.
They require accounts with a small handful of third party services (most free or with free tiers).
Jotform (free - CLICK HERE).
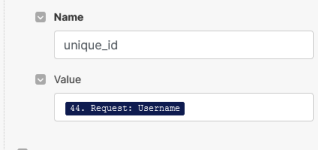
Simply log into your Jotform account and create a form with a single line text response. This is for the username. It’ll look like this when you go to the “Publish” tab and click to open the form -

Next you’ll need a RapidAPI account (free - CLICK HERE ) as well as to subscribe to the Tiktok Scraper API - (free up to 300 api calls per month CLICK HERE )
You’ll need a CloudConvert account (also free -CLICK HERE )
This scenario calls the API Flash API. This is also a free account (up to 100 screenshots a month) - CLICK HERE
You’ll need a D-ID account (CLICK HERE). There is a free tier for testing, but your videos will be watermarked, so you’ll AT LEAST want the $18 a month API plan (must have API plan, not studio plan).
You’ll also need a Cloudinary account (free - CLICK HERE ) if you want to do the caption overlay (or any overlays).
That’s it for the prerequisites. Now let’s get into the how-to.
The very first module is a Jotform module. This works off of a webhook that is triggered by the submission of a form. Just click to create a webhook and attach it to the form you should’ve already made (the one with the username input).
Next, disconnect the Jotform from the rest of the flow, then run the flow (with JUST the Jotform running) and fill out/submit your form. That way the data will populate.
You’ll need it in the next module…
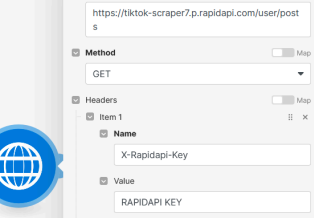
In the next module you simply have to fill in your RapidAPI API key.
You’ll need to input your API Flash API key in the Screenshot module.
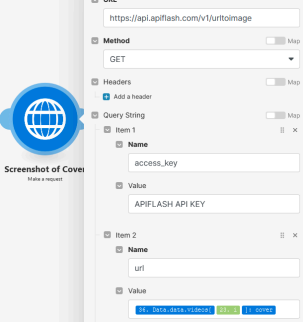
This takes a screenshot of the “cover” image of the video, which is a gif. It then feeds it to GPT4-Vision to describe the image for additional context.
Next, in the Avatar Video modules, you’ll need to input your D-ID credentials.

In addition to that, you need to modify some of the JSON in the Create Avatar Video module.
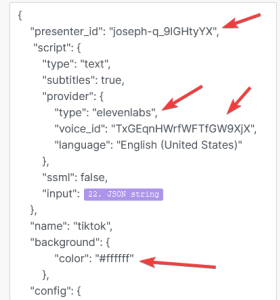
You’ll need to put in the correct presenter id (choose from D-ID’s selections). You’ll also need to choose a voice (chosen also from D-ID).
You may wish to change the background color as well.
Here are D-ID’s API documentation for more information - CLICK HERE
Here are the clips avatars available - CLICK HERE Here is the list of elevenlabs voices available - https://api.elevenlabs.io/v1/voices Here is the list of microsoft voices available - CLICK HERE Test them in the D-ID “studio” to hear what they sound like.
I also included modules (not connected but floating below) for talking images. This is where you can animate an image of a face or person to talk. All you have to do is input a source image -
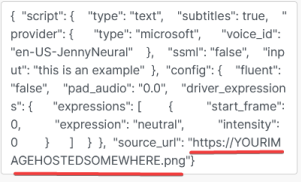
You’ll need to choose a voice for this as well.
Next in the flow, everything should already be set up, but if you choose to overlay things, you’ll need to prepare some assets to be used in Cloudinary.
After the video is generated in this flow, it is uploaded to your Cloudinary account so that it can be “transformed.” This just means that, once it exists in your cloudinary account, you can then overlay other images or text on top of that video using simple URL parameters.
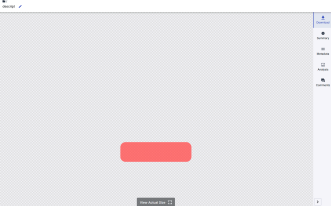
For this scenario, I created a transparent background with a simple rounded rectangle.

I made this in Canva on a 1080 by 1920 canvas.
Then I uploaded it to Cloudinary under the name “descript”.
After the video is uploaded to Cloudinary the next two modules are GPT modules asking for a brief “title”, which is what TikTok calls the video description, as well as a caption.
That caption is then overlaid onto that rectangle using a Transformation module. Let’s look at the Overlay Caption module to see how this works.
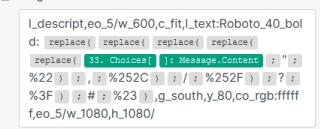
The first parameter is the overlay rectangle, followed by the amount of time I want it on the screen (5 seconds). Then the text width, font, size, etc. Then the text content, which comes from GPT. What’s with all those “replace” functions? That’s because sometimes GPT output will have special characters that DO NOT work with Cloudinary. Those replace the characters with URL-friendly ones.
The last few commands place the text at the bottom(ish) of the video in the center so it fits inside the rectangle, and sets the text color to white.
You can modify this however you like. Here’s some instructions on Cloudinary transformations - CLICK HERE
The thing is, you don’t have to just do a caption. You could also overlay other images, or icons, etc. It’s worth learning Cloudinary because there is a lot you can do with it.
That should be it for your set up, other than connecting your other accounts (like OpenAI, Google, etc).
Also, make sure to designate the drive folder you want the video to be uploaded to. You don’t have to just upload to Gdrive either.
You can also publish to LinkedIn, Twitter, Facebook, Pinterest, or even YouTube. If you’ve purchased the Ultimate Bot Bundle, all of the modules for those services already exist. Just copy them and paste them here.
TikTok Recreator (keyword)

This scenario is IDENTICAL to the previous one except for only one thing…it uses a different TikTok scraper API endpoint to scrape videos fetched from a keyword search instead of a username.
So, the form will need to capture a keyword.

You’ll also notice different parameters in the API call.
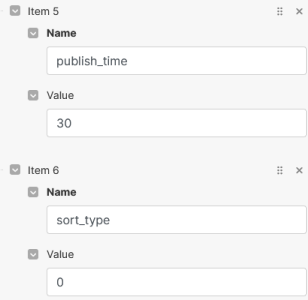
These parameters each mean something different and will therefore fetch different data.
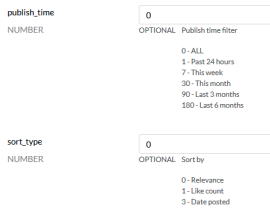
Check out all parameters under the Search APIs here => ( CLICK HERE )
Other than that, every other aspect is identical to the previous scenario.
Automate the bots effortlessly with our user-friendly platform and unlock the power of AI-driven efficiency in just a few simple steps!
To maximize the performance and engagement of this bot, it is crucial to tailor the ChatGPT prompts to your unique business context.
Don't miss out on the incredible opportunities that await - launch your bot now and experience the game-changing benefits of AI firsthand!
