


Social Assistant News Bot v2
- Easy setup, zero coding, plug & play file
- Runs on autopilot using ChatGPT
- Fully customizable and adjustable
Bot setup guide
Includes a duplicatable bot template and an exact step-by-step setup guide to get the bot running.
Create an account by clicking here.
You can access the Bot by
Click here
and follow the instructions provided in the tutorial below.
Social Assistant News Bot v2
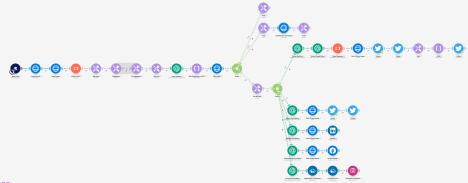
Ok, this scenario is a BEAST and requires a few different services (especially if you plan on using it as is and not modifying it).
You’ll need:
A Jotform account (for the intake form) - CLCIK HERE (free)
A RapidAPI account - CLICK HERE (free)
A ModelsLab (formerly Stablediffusionapi.com) account (for images) - CLICK HERE ($30 a month)
A Cloudinary account (for image crop) - CLICK HERE (free)
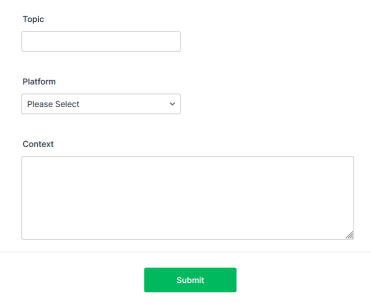
Once you have a Jotform account, you’ll need to create a form with these fields - Topic (short text)
Platform (dropdown menu)
Context (long text)
The dropdown menu should have these options -
● Twitter Thread
● Twitter Tweet
● Facebook Page Post
● LinkedIn Post
● Instagram Post

It’ll look like this once you click the “Publish” tab.
When you import the blueprint, you’ll be asked to create a webhook for the first module (the Jotform Module). Create one and link it to this new form.
You’ll also need to disconnect the rest of the modules and run only the Jotform module by itself, then fill in the form and submit. That way the data will populate in later modules.
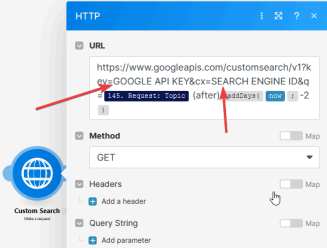
Next, you’ll need a Custom Search Engine from Google.
Follow the instructions on this page -
But basically you’ll create a Control Panel account.
Then create the search engine. For Search Settings add THIS URL - www.news.google.com/* (including the asterisk) - [**you don’t have to limit yourself to news, but that is the purpose of this particular bot]
When the search engine is created, click on it in your Control Panel, scroll down, and choose Get Started under Programmatic Access.

Then generate an API key.
You’ll have to input this, as well as your search engine ID (found in the search engine after you click it from your Control Panel) in the next module -
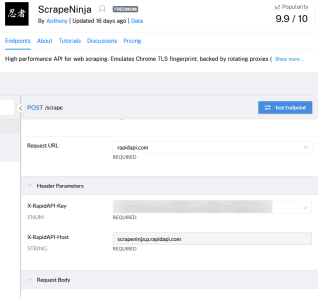
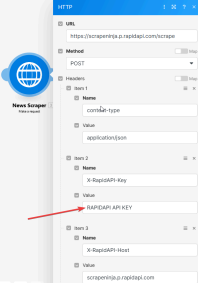
Next, you’ll need a RapidAPI account (it’s free ⇒ https://rapidapi.com/) and then subscribe to ScrapeNinja - CLICK HERE
Then grab your API key for the next module -
Then you’ll need a stablediffusionapi.com API key for the image generation (sign up here ⇒ CLICK HERE )

You’ll need that API key for both that module AND the “Get IMG After Processing” Module. A note on troubleshooting stablediffusionapi.com modules -
you need to unlink the router from the HTTP module and RUN the Scenario. Otherwise you won’t have the data to input into the other modules.
One of two things will happen. Either you will get an image back as a response (success), or you’ll get a response that says that it is “processing.” You can check this by clicking the little number at the top right of the module, scroll down to “Output” and look under “Data.” If the status is “processing” then when you link it back to the Router, you’ll have the data you need for the Fetch Results Still Processing HTTP module.
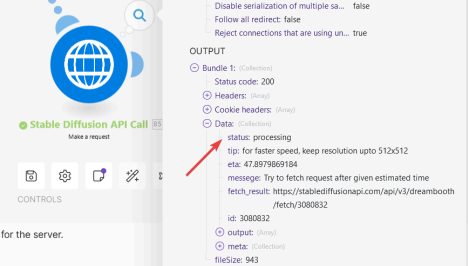
And when you run THAT module, you’ll have the image URL.
HOWEVER, you still need to run the scenario again to populate the correct data for the “success” status module.

Here’s how you can force it.
The image dimensions in the Scenario are set to be pretty large (1024 by 1024). That will, more often than not, lead to a “processing” status meaning you’ll have to fetch the image after a couple minutes (that’s why there’s a Sleep module in there).
However, if you change the dimensions to something small, say 512 x 512, then you have a much better chance of immediately getting a “success” status and the image being available right away.

Once you’ve managed to have both statuses run, you have the data you need to populate the rest of the modules correctly.
In the Twitter Thread Modules, you need to personalize the System Prompt in both the Hook bot and the Thread writer bot -
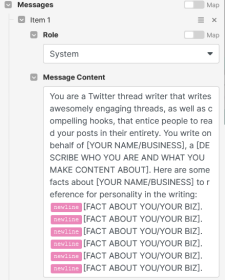
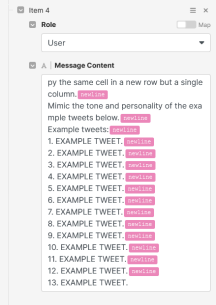
And in the Thread Writer you need to inputyourname/biznameandgiveexampleTweets in the user prompt-
Now, Twitter the set up…
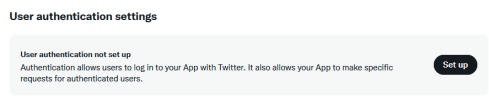
First step is to gain access to the Twitter API (if you haven’t already).
Here’s how.
(First, here are Make’s instructions - CLICK HERE)
Login to the Twitter Developer Portal (CLICK HERE) just need to be logged into your Twitter Account.
Under Projects and Apps, you want to create a Project, and then an App. Make sure it is NOT a Standalone App, but is within the Project.
The steps should be pretty self-guided, but here is more assistance if you need it - CLICK HERE
Once you have an app within a project, you need to “set up” the app here -
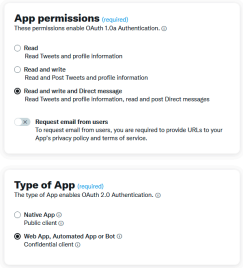
App permissions are read and write. Type of app is web -
Set app info to this (everything else remains blank) -
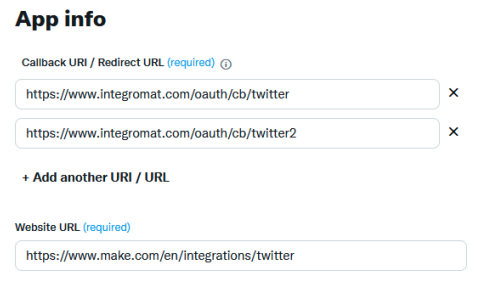
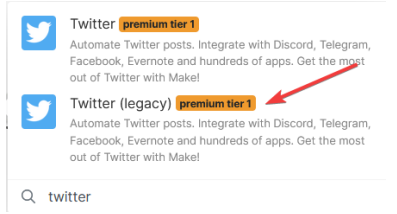
The reason you need two URI callback URLs is because you will be using BOTH the Twitter and Twitter legacy apps (v5 and v6).
“Legacy” is v5 and you use the Upload Media and Make an API call modules with that. The regular Twitter is v6 and you use Create a Tweet with that.
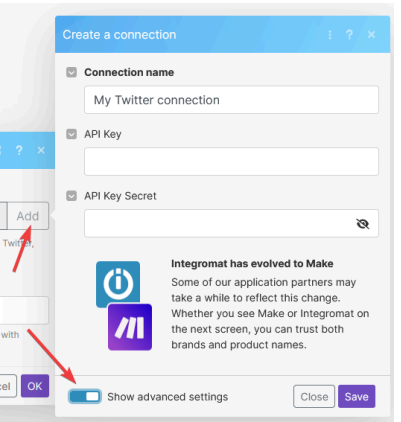
When you create a connection, you will need your API information for the v5 legacy module and your Client ID and Secret for v6 (so save them both). Click “show advanced settings” to get there.
Now everything else is already pre-input.
NEXT, we should go over troubleshooting…
First let’s explain what’s going on here…
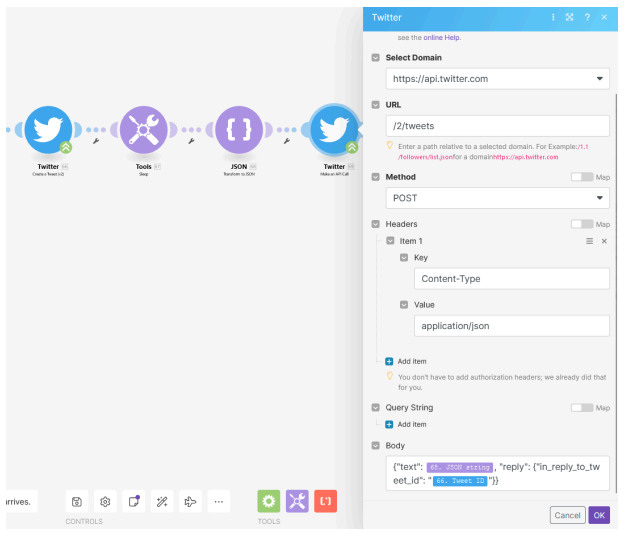
The very first Twitter module is a normal create a tweet module.
But after that there is a sleep module (because you can’t make too many API calls at once) and then a JSON module.
The JSON module takes the next tweet in the thread and transforms it into a JSON, because that is the language the Twitter API accepts.
After that, the subsequent Twitter modules are API calls.
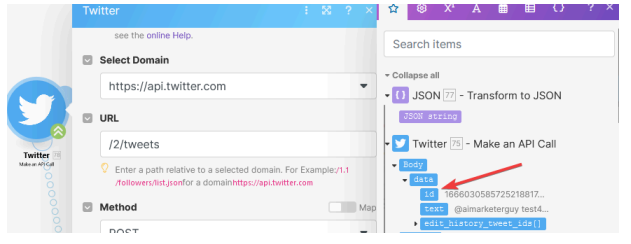
Within the JSON of those calls, it requires the PREVIOUS TWEET’s ID.
The problem is, until those modules run once, that data variable won’t exist.
So, you’ll probably have to go to each and every Make an API call Twitter module and run it by itself with some text and a random Tweet ID (right click and choose Run this module only).
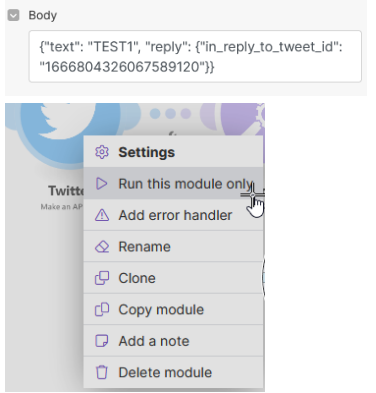
Then, when you go to the NEXT module and click within the JSON response area, you’ll be able to choose the Tweet ID from the previous module you just ran.
From this point forward, all other GPT modules will need to be populated with your name or business name and your example posts (just like the Twitter Thread examples above).
After that, the last thing that will need to be set up is your Cloudinary account. Simply create a free account and connect it to Make.com (it’s free => CLICK HERE ).
The reason we use Cloudinary is to crop the image so that Instagram will accept it (otherwise it will throw an error).
You will also need, of course (if it wasn’t obvious by now) your own OpenAI account to connect to Make.com as well.
And your social media accounts.
So, that was a LOT of info…let’s recap what is going on here…
● First you have a Jotform that uses YOUR input to give to GPT in order to give it context. You’ll give it a topic and some of your thoughts. You’ll also indicate what platform you want the post to go to.
● Next we call Google’s API and trigger your new custom search engine to search Google News for related news stories.
● Then we use ScrapeNinja to scrape the text off the news page to give to GPT. ● Then GPT is given the news and asked to create a summary.
● After that Stablediffusionapi.com is given the news main image and it is tasked with generating an A.I. image similar to the news image.
● The rest of the paths in the flow take the GPT summary and Stablediffusionapi image to post to the platform of your choice (you indicate in the form).
● The platforms include - Twitter (thread OR single tweet, with image), LinkedIn, Instagram, Facebook.
Please keep in mind this scenario is YOURS. You can add other platforms if you like, OR you can take away the field for choosing a platform, delete the filters (filters are what keep the post only going to a single platform) and have it post to ALL platforms…it’s entirely up to you.
Please also note, the example hooks are not intended to be changed. You CAN, but these hooks have worked in the past so you may want to keep them.
Everything else, however, is intended to be molded to your personal style through examples.
Automate the bots effortlessly with our user-friendly platform and unlock the power of AI-driven efficiency in just a few simple steps!
To maximize the performance and engagement of this bot, it is crucial to tailor the ChatGPT prompts to your unique business context.
Don't miss out on the incredible opportunities that await - launch your bot now and experience the game-changing benefits of AI firsthand!
