


SEO KW Planner Bot KW Seed v2
- Easy setup, zero coding, plug & play file
- Runs on autopilot using ChatGPT
- Fully customizable and adjustable

Bot setup guide
Includes a duplicatable bot template and an exact step-by-step setup guide to get the bot running.
Create an account by clicking here.
You can access the Bot by
Click here
and follow the instructions provided in the tutorial below.
These scenarios depend on a Google Adwords account. Adwords is FREE but requires set up that includes credit card information. Once you have set up an adwords account, you can connect your Google Adwords account to Make following these instructions - CLICK HERE
These two SEO bots are essentially the same bot, but configured for different Google Ads API calls.
Both calls use Google Keyword Planner to get keyword ideas from Google. However, one uses seed keywords to find those ideas. The other uses a website to find those ideas. So, either a keyword seed or a website seed SEEDs Google Keyword Planner to find you new keywords.
SEO KW Planner Bot KW Seed v2

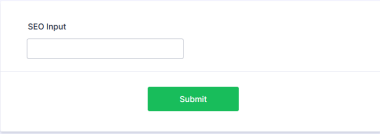
The first module is a form input using Jotform. This is so you can input a seed keyword into the Google Adwords API call.
Here’s how you set that up. It requires a (free) Jotform account (CLICK HERE). Once you have a Jotform account, you can create a form (it’s really easy).
Just add Short Text Inputs for however many seed keywords you want to start with (default is one).
Then, when you fill it out and click submit, the scenario will trigger.
If you choose to use more than one seed keyword, be sure to modify the JSON input in the Google Adwords API call (more on that below).
Next, the API documentation for using Google Keyword Planner for keyword ideas is here: CLICK HERE
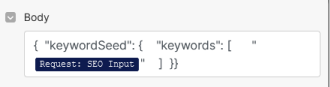
In the right hand panel you can actually build out the JSON to use. However here is the code snippet for the Keyword Seed (KW SEED) bot:
KW SEED -
{ "keywordSeed": { "keywords": [ "sell on amazon" ] }}
Multiple KW’s -
{
"keywordSeed": {
"keywords": [
"sell on amazon",
"amazon fba",
"amazon private label"
]
}
}
As mentioned, currently it is set to one keyword and the variable from your form will fill in that part.
*PROTIP, you need to run the Jotform module first before any output can be used as a variable in other modules. So, disconnect Jotform from all other modules and then click run. Then fill out your form (go to the Publish page and just open it in a new window) and click Submit. This will trigger the module. Then when you reconnect it, you’ll see your answers as variables.
Also, don’t forget to input your Customer ID -
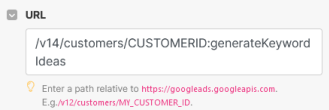
Your customer ID is in the upper right corner of your account when you log into Adwords. Remove the dashes (only numbers).
The next two modules simply gather a handful of keywords (repeater is set to 10) for your A.I. article writer to have a small few to focus on.
The remaining modules are GPT modules that call upon the A.I. to generate; A title
An introduction
An article body
A Google snippet excerpt
A URL slug
All focused on your SEO keyword list.
Finally the article is posted in DRAFT mode on your Wordpress site.
If you do not have a Wordpress site, replace that module with your preferred provider.
If you do have a Wordpress site, connect it to your Make account here -
SEO KW Planner Bot Site Seed v2

The only difference between this scenario and the keyword seed one is that it uses a website instead of a keyword to find new keywords. This is reflected in the Google Adwords API call JSON:
SITE SEED -
{ "siteSeed": {"site": "https://www.website.com" }}
Here, instead of inputting a keyword in your Jotform, you’d enter a website. Be sure it is a full website, including https://

*PRO HACK - if you really want to get experimental you can combine these functions with the following JSON. Just don’t forget to input all the proper parameters in your form input.
KEYWORD AND SITE SEEDS -
{
"keywordAndUrlSeed": {
"keywords": [
"keyword1",
"keyword2"
],
"url": "https://www.website.com"
}
}
To better explain the REPEATER, because it may be confusing from the notes, is that when the Google Ads API runs, it will bring back many dozens of keywords. However, each is delivered in it’s own “bundle.” You can only deliver one bundle per run to OpenAI so you can’t give it a list.
The repeater runs a small segment of modules over and over again (based on what you input…this scenario has it run 10 times) so that way multiple bundles can be ran. The increment simply numbers the bundles and then the aggregator grabs all of the ones it ran and puts them in a single list. THAT LIST is what is used to give a keyword list to OpenAI for the purposes of writing SEO content.
Also, don’t forget the filter. The filter before the repeater makes sure only the keywords you want to focus on make it through. The scenario has it set to keywords with over 10k searches, but you can also do it by competition, or any other metric.
Remember that you also need to tweak the prompts in the OpenAI modules to fit your specific needs. You’ll need to input your website or business information -
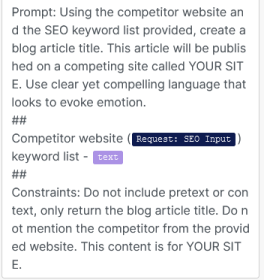
Don’t forget to modify the GPT module prompts as needed. You may wish for more or less words, or a different structure altogether. Remember, this is YOUR scenario now.
That’s everything for these scenarios.
Automate the bots effortlessly with our user-friendly platform and unlock the power of AI-driven efficiency in just a few simple steps!
To maximize the performance and engagement of this bot, it is crucial to tailor the ChatGPT prompts to your unique business context.
Don't miss out on the incredible opportunities that await - launch your bot now and experience the game-changing benefits of AI firsthand!
