


Print On Demand Bot
- Easy setup, zero coding, plug & play file
- Runs on autopilot using ChatGPT
- Fully customizable and adjustable
Bot setup guide
Includes a duplicatable bot template and an exact step-by-step setup guide to get the bot running.
Create an account by clicking here.
You can access the Bot by
Click here
and follow the instructions provided in the tutorial below.
Print On Demand v2

This scenario requires the use of a third party A.I. generation software (sign up here > CLICK HERE).
You can substitute this for Midjourney, using the imagineapi Midjourney API, or another service if you choose.
This scenario also publishes products to Printify.
First, you need to sign up for an account with ModelsLab (formerly stablediffusionapi).. (again > CLICK HERE )
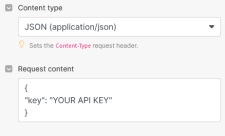
This will give you the API key necessary to generate the AI art.
Now, let’s move on with the flow.
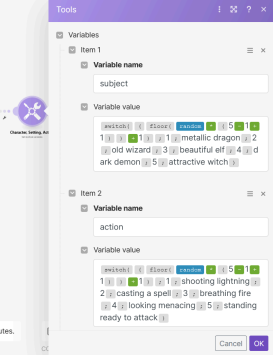
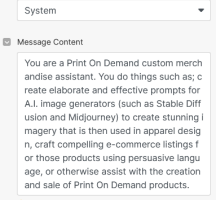
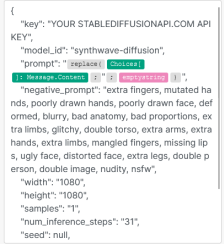
The first module is where you set your variables. These variables are designed to tell the A.I. what to create. They include a subject, a setting, and an action. YOU NEED TO REPLACE THE TEXT THAT IS THERE WITH YOUR OWN…
Following this module is a GPT module that creates an image prompt. Please review the prompts and adjust them to your needs
After that is the ModelsLab.com API call to generate an image.
After you sign up, there are a few more steps to take to ensure your images are exactly what you want them to be.
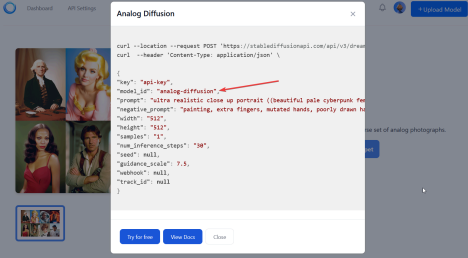
First, go to the ModelsLab.com website and choose Models.
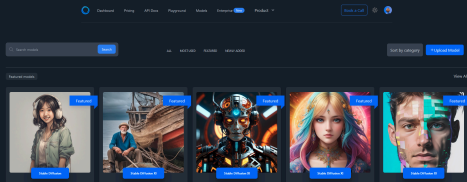
Click on the model you like best and then click “view code snippet”
You’ll see the model ID in the code (also take note of which version is being called in the URL - v3, v4, or v5).
Now to the Scenario…
The URL, model_id, and other parameters are all JSON variables that you can modify to your needs. Learn more about them in the API documentation here >
(The vast majority of API calls you’ll make will be to Community Models using v6)
Also, be sure to input your API key in the HTTP modules that access the ModelsLab API. These are labeled as “Generate ModelsLab Image” and “Get ML Image After Processing.”
Next is a Router and then it goes off into seemingly confusing directions. This is just because Stablediffusionapi.com returns one of two successful responses to the API call - either Success or Processing.
Since there are two potential responses, we have to account for either. So, if the image creation was a Success, it will immediately save the URL to a variable. BUT, if it is Processing, it just needs time to render. So it will wait a little while, then try to fetch the image.
After the image is fetched or generated, the URL will be saved to a variable and then retrieved from that variable further down the scenario.
Then the image is uploaded to Make, and then onto Printify.
From there GPT is tasked with creating the listing. You need to alter the prompts to inform GPT exactly what it is creating… Here is the default:
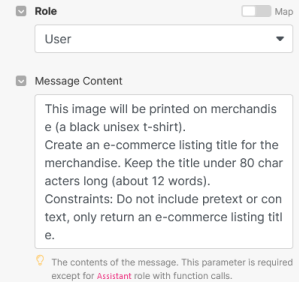
Finally, the product listing is created. In the last module, if you change the product (currently set to black tshirt) then be sure to also choose appropriate variants. UNTICK THE MAP SETTING then you’ll be able to choose from a dropdown list.

Not only will you need a variant for every size/color, but you will also need the following image details:

These settings are already in place for you. Just remember, in case they get wiped, that you need them. These settings place the image in the center of the torso. The image ID is mapped from the previous module.
And that’s it! Happy Printing and thank you for purchasing our blueprint.
** PRO TIP: GPT works better with examples, that is why the image prompt Prompt has 5 examples of image prompts. The default is for anime images. You should use example prompts for images in the style you wish to generate images in.
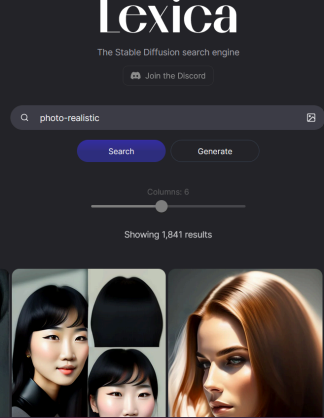
Simply visit Lexica Art (CLICK HERE), search for the style of art you wish to generate images in, and copy prompts from imagery you like.

CHEERS!
Automate the bots effortlessly with our user-friendly platform and unlock the power of AI-driven efficiency in just a few simple steps!
To maximize the performance and engagement of this bot, it is crucial to tailor the ChatGPT prompts to your unique business context.
Don't miss out on the incredible opportunities that await - launch your bot now and experience the game-changing benefits of AI firsthand!
